mercredi 26 août 2015

Terminators Salamanders / Salamanders Terminators

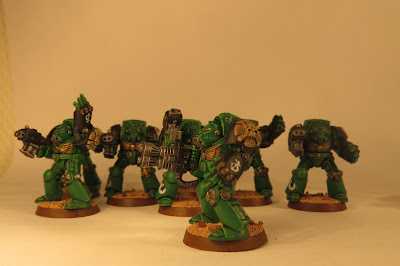
Allez, je poste quelques articles avant mes vacances qui seront vendredi! J'ai quand même pas mal avancé cet été, et profité de soirées tranquilles pour manier l'aérographe. Je commence à avoir une belle petite force de Salamanders peinte, avec notamment une unité de dix Terminators. Bon alors, ne vous attendez pas aux poses dynamiques et aux gros socles, car il s'agit de Terminators ancienne version. En fait, il s'agissait de deux unités de 5, mais j'ai transformé un sergent en Terminator avec poing tronçonneur, en limant la bannière qui était sur le dos. En parlant de bannière, je n'ai pas encore posé celle que j'avais prévu de mettre sur le sergent, donc le produit n'est pas totalement fini. Néanmoins, les voici :

Here we are, I'm posting a few articles before going on holidays on Friday! I was able to get a few things done this summer and benefited from the quiet evenings to handle the airbrush. I'm starting to have a nice little painted force of Salamanders, including a unit of ten Terminators. Well, do not expect dynamic poses and big bases, because they are a much older version of Terminators. Actually, they were two units of 5, but I turned a sergeant into a Terminator with chainfist, by removing the banner that was on his back. Speaking of which, I have not yet glued the one I had planned to put on the sergeant, so the product is not completely finished. Nonetheless, here they are:

Salamanders Terminators

Pour l'épée énergétique du sergent, j'ai eu recours à l'aérographe et au tutoriel de Buypainted concernant la peinture des armes énergétiques que vous trouverez ici. J'ai dû m'y reprendre à deux fois car je n'avais pas laissé sécher la peinture de la première moitié assez longtemps. Finalement, j'ai réussi à ma deuxième tentative. La technique est finalement assez simple, il suffit de ne pas trembler : - masquer une partie de l'épée avec du scotch de peintre
- faire un dégradé à l'aérographe en suivant cet ordre : blanc, bleu clair, bleu foncé
- laisser sécher 24 heures
- répéter l'opération sur l'autre partie de l'épée, mais à l'envers : si vous avez commencé par le bleu en bas et la pointe blanche, faites la base blanche et la pointe bleue

For the Sergeant's power sword, I used my airbrush and the tutorial from Buypainted about painting energy weapons that you can find here. I had to do it twice because I had not let the paint on the first half of the sword dry long enough. Finally I succeeded on my second attempt. The technique is actually quite simple, just do not shake :
- Hide a part of the sword with masking tape
- Make a gradient with the airbrush in the following order: white, light blue, dark blue
- Let it dry for 24 hours
- Repeat on the other side of the sword, but the other was around: if you started down with the blue and white tip, make the base white and tip blue 

NMM power sword airbrush

NMM power sword airbrush

Chainfist

Chainfist
Le poing tronçonneur est un bitz du kit actuel des Terminators

The chainfist is a bitz from the current Terminator kit 

Flamer

Flamer
Et pour finir : le lance-flammes, toujours utile

And finally: the flamethrower, always helpful

jeudi 6 août 2015

Décors pour Warhammer, 40k et Mordheim : Dave Graffam Models / Scenery for Warhammer, 40k and Mordheim : Dave Graffam Models

Je me prépare tranquillement à jouer une partie de Mordheim ce soir et tester à l'occasion mes comtes vampires qui constitueront ma bande de morts vivants. Pour se préparer et jouer sur une jolie table, nous avons investi dans des décors faciles à réaliser et qui rendent bien sans d'autre travail que du découpage et du collage. Nous avons découvert sur Internet le site de Dave Graffam (http://www.davesgames.net/) qui vend des décors à imprimer sur papier cartonné de type médiéval fantastique, voire futuriste qui feront de beaux décors pour Mordheim. En plus ça ne coût vraiment pas cher, donc pour 10€ et le papier qui me restait des faire-part de mon mariage, on a de quoi se créer une petite ville. Ayant quand même pas mal de boulot cet été, je n'ai eu l'occasion de ne monter qu'une seule maison, mais qui une fois montée, rend vraiment bien : 


I am slowly getting ready to play a game of Mordheim tonight and test my Vampire Counts which will form my band of undead. To be prepared and play on a nice table, we invested in easy to make scenery that look great without too much work except cutting and pasting. We found on the internet Dave Graffam's website (http://www.davesgames.net/) that sells scenery printable on card stock  for fantasy or futuristic games that will make beautiful scenery for Mordheim. In addition they are really cheap so for € 10 and the paper I had left from my wedding invitations, we have the material to create a small town. However, as I have a lot of work this summer, I only could build one house, but once built, looks awesome:


mardi 4 août 2015

Portes pour Space Hulk / Doors for Space Hulk

Bon, aujourd'hui je ne vous promets pas de travail de peinture extraordinaire. Mais avant de casser mon aérographe, j'ai peu peindre rapidement les bases des portes fournies pour Space Hulk. Même si ce n'est qu'un détail dans ce jeu de plateau déjà si beau, la couleur métallique rend tout de même mieux qu'une base violette :

Well, today I do not promise an extraordinary paint job. But before I broke my airbrush, I was able to quickly paint the door bases provided for Space Hulk. Although this is only a detail in this board game already so beautiful, metallic color still looks better than a purple base:


lundi 3 août 2015

Tutoriel : Peinture tanks, MIG Brown Wash et Vallejo Pigments / Tutorial : Painting tanks, MIG Brown Wash and Vallejo Pigments

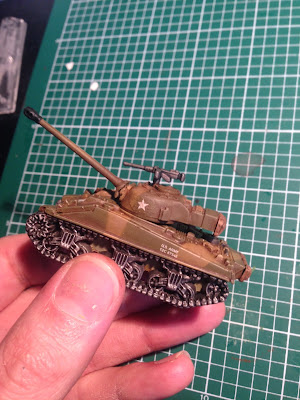
La peinture de mes Salamanders avançant bien (j'ai fini mes 10 terminators qui sont en attente d'une couche de vernis et de petites photos), j'en ai profité pour me renseigner sur la façon dont je vais peindre ma chimère et mon Leman Russ de Catachan. Pour ne pas m'entrainer sur mes figurines à 45€ pièce, j'ai préféré tester le camouflage que je veux obtenir sur un tank Sherman de la marque Flames of War, grâce à un tutoriel déniché sur internet :


L'échelle est plus petite que Warhammer 40k, ce qui a constitué un défi supplémentaire car les détails sont bien plus petits. J'ai trouvé un modèle de Sherman à 4,90€ sur EBay, et après avoir monté la miniature, j'ai décidé de m'attaquer à la peinture à l'aérographe.

As the paint job for my Salamanders army is progressing well (I finished my 10 terminators which are actually waiting for a coat of varnish and some pictures of them), I took the opportunity to learn about the way I'm going to paint my Catachan Chimera and Leman Russ. In order not to practice on my models that cost €45 a piece, I preferred to test the camo pattern I want to get on Flames of War Sherman tank , thank to a tutorial found on the Internet:


The scale is smaller than Warhammer 40k, which was an additional challenge because the details are much smaller. I found a Sherman tank model at €4.90 on EBay, and after assembling the miniature, I decided to airbrush it.

Une méthode simple :

- couche de base à l'aérographe de Zandri Dust, suivie d'un brossage à sec en Tallarn Sand sur l'ensemble du tank
- masquage avec de la plastiline pour réaliser le camouflage
- deuxième couche à l'aérographe sur le tank en Catachan Green et brossage à sec en Death Forest World en faisant attention à ne pas arracher la plastiline
- après avoir enlevé la plastiline, on peut peindre les détails : boltgun métal pour les chenilles et l'arme de tourelle, et brun pour les sacoches
- à ce stade, il convient de passer à l'aérographe (ou en bombe) une couche de vernis satiné pour les étapes suivantes
- pose des décalcomanies (achetés sur Amazon) et lavis en Badab Black sur les parties métalliques
- brossage à sec en Necron Compound sur les parties métalliques
- deuxième couche de vernis satiné. Le vernis satiné a l'avantage de permettre au lavis de se glisser dans les détails et de protéger les décalcomanies.

A simple method:

- Base coat of Zandri Dust with the airbrush, then a dry brushing of Tallarn Sand across the whole tank
- Mask with silly putty to make the camo pattern
- Second layer on the tank in Catachan Green, still with the airbrush, then dry brushing with Death World Forest while being careful not to remove the silly putty while doing so
- After removing the silly putty, you can paint the details: Boltgun metal for the threads and the gun on the turret, and light brown for the bags
- At this point, it's important to apply a layer of satin varnish with the airbrush (or a spray can) in order to do the next steps
- Apply decals (purchased at Amazon) and wash the metal parts with Badab Black 
- Dry brushing of Necron Compound on metal parts
- Second coat of satin varnish. The satin varnish has the advantage of allowing the wash to slip into the details and protect the decals.


Ensuite, vient l'étape du "salissage" du tank : en gros, simuler les épreuves du temps sur la coque et les chenilles. Pour ce faire, j'ai acheté une encre marron, de la marque Mig Productions, ainsi que les pigments de chez Vallejo (qui n'est autre chez la marque Prince August sous un autre nom).

La technique est plutôt simple :
- on applique un gros lavis avec l'encre marron, qu'on laisse sécher une vingtaine de minutes
- une fois sec, il suffit de passer un coton tige sur l'ensemble des parties surélevées afin de laisser l'encre dans les recoins (ne pas passer l'encre marron sur les chenilles et le canon)
- sur les chenilles, appliquer les pigments et les fixer avec un produit spécial, encore de chez Mig Productions : Pigment fixer.

Le résultat est plutôt probant et assez rapide. J'en suis tellement satisfait que je pense utiliser cette méthode pour peindre ma chimère et mon Leman Russ!

Then comes the stage called "weathering" of the tank: roughly simulate the test of time on the hull and the threads. To do this, I bought a brown wash, produced by Mig Productions and pigments from Vallejo (which is actually Prince August under a different name).

The technique is quite simple:
- The brown wash is applied on the whole tank : allow it to dry for about twenty minutes
- Once dry, just wipe all the raised portions with a q-tip to let the ink only in the recesses (do not apply brown wash on the threads and gun)
- On the threads, apply the pigments and secure with a special product, still from Mig Productions: Pigment fixer.

The result is rather convincing and quite fast. I am so pleased that I think use this method to paint my chimera and my Leman Russ!