lundi 4 mai 2015

Tutoriel : le choix des Armes : magnétiser des Centurions / Tutorial : choosing weapons : how to magnetize Centurions

Sur ma lancée de magnétisation, ma nouvelle passion, j'ai décidé de m'attaquer au montage de mes centurions. Comme pour le Land Speeder, je veux avoir le choix, de les utiliser soit en assaut, soit en soutien. Et cela requiert un peu de modifications sur les bras de ces grosses brutes.
Deux choses peuvent être changées : les armes de poitrine et les armes sur les bras.

I continue with magnetization, my new passion, so I decided to build my centurions. Like with the Land Speeder, I want to have the choice of using them either as assault or support troops. And this requires a few changes on the arms of those big brutes.
Two things can be changed: chest weapons and those on the arms.

Pour les armes de poitrine, il suffit de percer le torse, d'y placer un aimant et de coller un aimant sur l'arme à changer. J'ai du bien limer les armes pour qu'elles ne dépassent pas du torse. Pour les bras, c'est pareil. J'ai percé le bras par le bas et ensuite les différentes armes au même endroit pour pouvoir adapter. J'ai même poussé le vice sur les poings tronçonneurs : j'ai percé un trou sur le côté pour pouvoir alterner lancer flammes et fuseur. Voici le résultat sur mon sergent que j'ai également converti avec une tête Dragonforge :

For chest weapons, I just drilled the torso, inserted a magnet in the hole and glued another magnet on the weapon that needs to be changed. I had to file the weapons so they could easily fit in and not stand out of the torso. For the arms, it's the same. I drilled the bottom of the arm then the different weapons on the top. For the chainsaws, I have even gone as far as drilling a hole on the side to be able to alternate flamers and melta. Here is the result on my sergeant which I also converted using a Dragonforge head:

Centurion sergeant

Centurion sergeant

Centurion sergeant

Centurion sergeant

Centurion sergeant

Centurion sergeant

Centurion sergeant

Centurion sergeant

Tutoriel : le choix des armes : magnétiser un Land Speeder / Tutorial : choosing weapons : how to magnetize a Land Speeder

Ayant perdu mon vieux Land Speeder, transformé en buggy, un peu mal peint et mal fait à l'époque, j'ai décidé de réinvestir l'importante somme de 25€ pour une nouvelle pièce, prix ma foi honnête pour le kif procuré par deux heures de modélisme. Devant les différents choix proposés, j'ai décidé de magnétiser entièrement le figurine pour pouvoir adapter les armes à la situation.

Having lost my old Land Speeder, transformed into buggy, badly painted and horrible at the time, I decided to reinvest the substantial sum of 25 € for a new model, a fairly decent price for the joy provided by two hours of modeling. Before the various choices available, I decided to fully magnetize the figure in order to adapt the weapons to the situation .

Les choix concernent :
- les portes arrières : soit des portes sans rien, soit des lance-missiles
- l'arme tenue par le copilote : bolter lourd/lance plasma
- l'arme du bas : canon d'assaut/lance-flammes

The choices are:
- The rear doors: either a door without anything or missile launcher
- The weapon held by the co-pilot: heavy bolter / plasma launcher
- The weapon at the bottom: assault cannon/ flamethrower

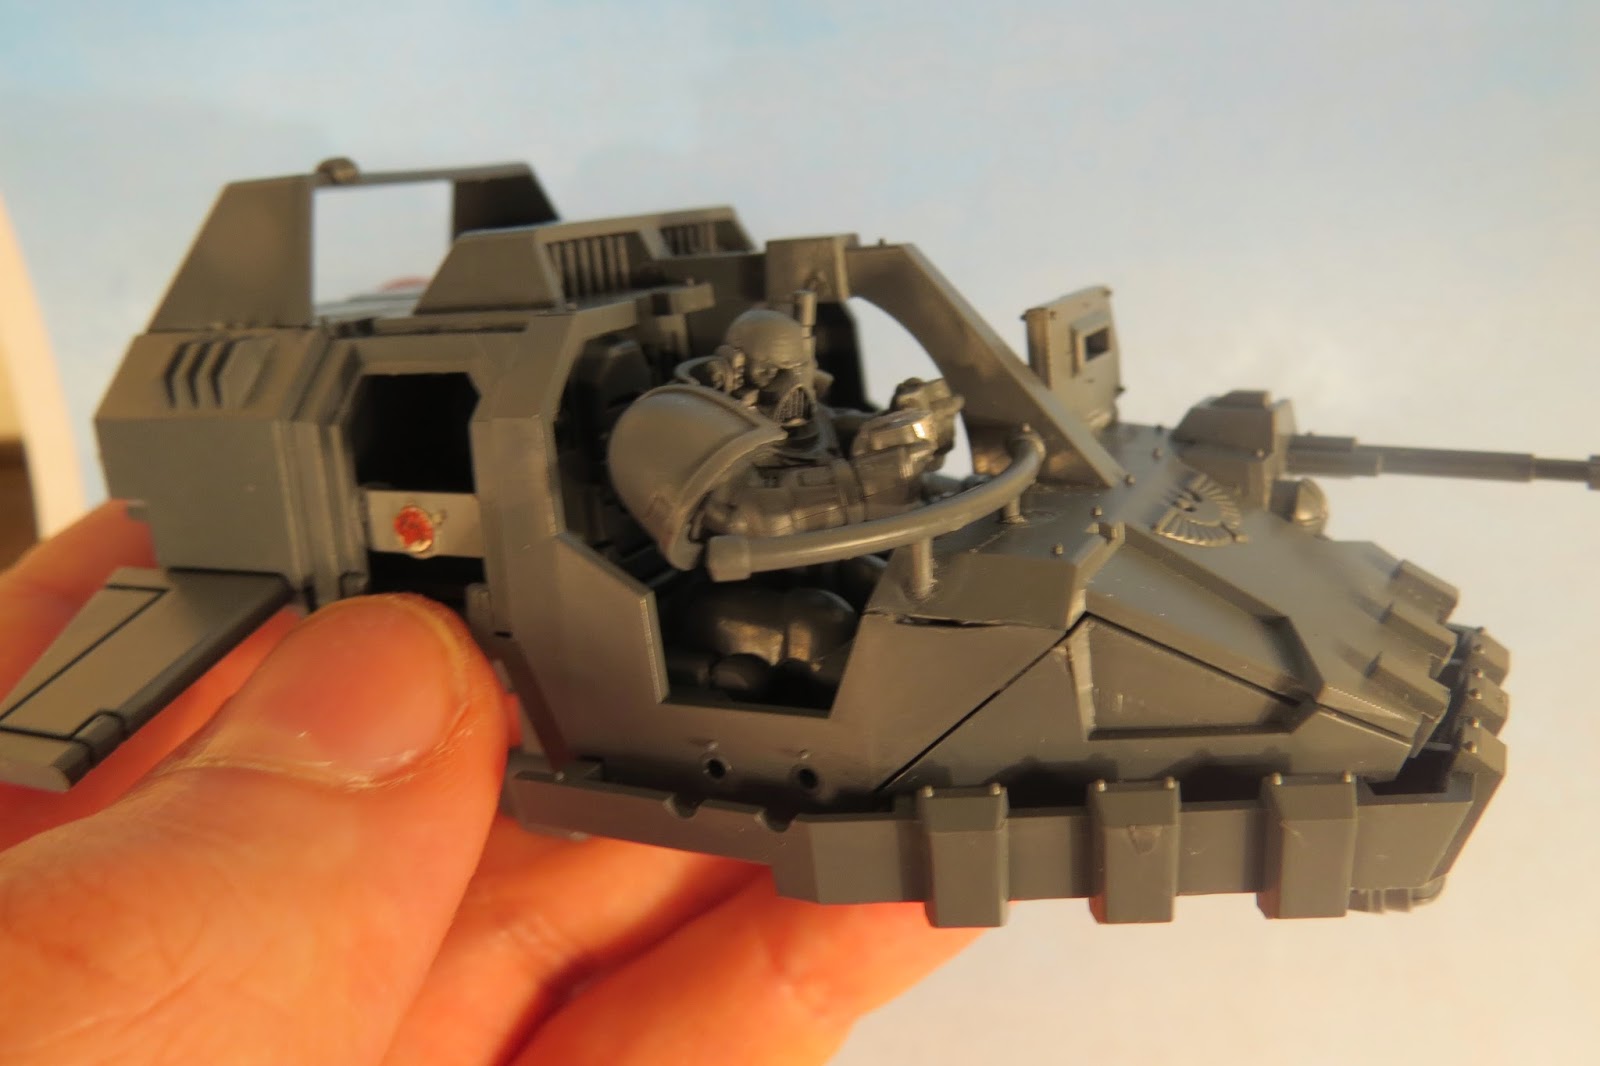
1) J'ai d'abord monté le Land speeder en trois parties pour faciliter la peinture ultérieure : le bas, le cockpit avec les jambes des pilotes et le haut de la coque :

1) I first assembled the Land speeder into three parts to make subsequent painting easier : the lower part, the cockpit with the pilots legs and the top of the hull:


2) Pour pouvoir changer les portes, j'ai installé en travers de l'encadrement un morceau de grappe plastique dans lequel j'ai percé un trou pour accueillir l'aimant. J'ai ensuite creusé un peu les portes pour y coller l'autre aimant. Un conseil, pour être pile en face, je mets une petite couche de peinture rouge une fois la première partie posée (ici la grappe dans l'encadrement de la porte), qui permet de marquer l'endroit exact où il faudra poser l'autre aimant.

2) In order to change the doors, I installed across the doorframe a piece of sprue in which I drilled a hole to place the magnet. I then scooped the door before gluing the other magnet. Piece of advice : in order to have the magnets corresponding perfectly, I use red paint once the first part is glued (here the sprue in the doorframe), which marks the exact spot where you put the other magnet.


3) Pour le lance-flammes/canon d'assaut : rien de compliqué. Il suffit de percer dans la pièce qui soutient la lampe un trou pour y accueillir un aimant et de faire la même chose sur l'arme en elle-même, je pense que vous avez compris le principe : 

3) For the flamer / assault cannon: nothing complicated. Just drill in the piece that supports the lamp a hole to place the magnet and repeat the process on the weapon itself, I think you get the idea:


4) Et maintenant, un peu plus dur. Je voulais que le copilote qui tient l'arme puisse pivoter sur tout l'axe de tir et également qu'il puisse changer d'arme. Pour cela, j'ai du fixer les bras au torse et couper une partie de l'axe qu'il tient pour remplacer la tige manquante par un aimant. J'ai fini par monter le torse en entier pour que l'ensemble puisse bien tenir.

4) And now something a bit harder. I wanted the copilot holding the weapon to be able to rotate around the axis of shooting and also be able to switch weapons. in order to do so, I had to glue the arm to the torso and cut a part of the axis and replace it with a magnet. I then assembled the entire torso so that everything holds tight together.


Ensuite, c'est assez facile : j'ai percé un trou dans l'arme pour qu'elle tienne sur ses mains et qu'on puisse alterner entre le bolter lourd et le lance plasma. Pour que le copilote soit en mesure de pivoter, je l'ai également aimanté aux jambes :

Then it is quite easy: I drilled a hole into the weapon to fit onto his hands and have the ability to alternate between a heavy bolter and multi-melta. In order for the co-pilot to be able to move, I also magnetized the legs:


Le résultat permet à la fois de changer d'arme et de pivoter autour de l'axe de tir pour plus de réalisme :

The result allows the weapons to switch and the shoort to pivot around the axis of firing for more realism:


5) Pour le pilote, j'ai pu me faire un kif et utiliser une des têtes africaines de Dragonforge achetées précédemment :

5) For the pilot, I enjoyed myself by using on the African-American heads from Dragonforge I previously purchased:


Les têtes sont sympas, mais les fixer directement à l'armure space marine ne rend pas super bien. Pour plus de réalisme, j'ai utilisé un bas de casque qui ressemble à une minerve, que j'ai troué pour y coller la tête. Un petit pilote sympa avec de belles dreadlocks. Pas très Imperium Compliant, mais bien plus awesome que les crânes rasés Ultramarines.

The heads are cooler, but assembling them directly on the space marine armor does not look great. For added realism, I used the lower part of a space marine helmet that resembles a neck brace, and drilled a tiny hole into it. Here is a nice pilot with beautiful dreadlocks. Not very Imperium Compliant, but more awesome than the Ultramarines shaven heads.


Il ne me reste plus qu'à le peindre! Entre nous, j'aurais pu pousser le vice jusqu'à installer des LED à la place des phares, mais bon, on verra...

Now I just need to paint it! Between us, I could not go as far as to install LEDs instead of the lamps, but hey, we'll see ...

Alors que revoilà le Monolithe / Here is the monolith again

Les nécrons sont donc tous très faciles à peindre. Les troupes de base prennent peu de temps, les personnages spéciaux non plus et les bâtiments les plus imposants encore moins. On va dire que je radote, mais j'ai encore été surpris de la facilité de prise en main de l'aérographe et du rendu comparé aux efforts fournis.

Necrons are all very easy to paint. Basic troops take little time, so do special characters and the bigger war machines even less. You'll say that I ramble, but I was once again amazed how easy it was to use the airbrush and by the result compared to the efforts provided.

Pour peindre cette grosse bête, j'ai juste procédé simplement :
- couche de Caliban Green à l'aéro
- éclaircissement des arêtes en Warpstone Glow, toujours à l'aéro, mais avec un tout petit jet
- brossage des arêtes en Scorpion Green pour un dernier éclaircissement
- peinture des canons en Abaddon Black et éclaircissement en Gris
- pose d'une première couche de vernis pour "sécuriser" l'ensemble
- pose des décalcomanies et des tubes verts
- peinture des insignes de la porte en doré et lavis d'Agrax Earthshade pour avoir la même couleur que les décalcomanies

To paint this big beast, I used the following method:
- Layer of Caliban Green with the airbrush
- Highlighting the edges with Warpstone Glow, still with the airbrush
- Drybrushing the edges with Scorpion Green for the last highlight
- Painting the cannons with Abaddon Black and highlighting with Grey
- Applying a first layer of varnish to "secure" the model
- Applying decals and green tubes
- Painting the signs on the door in gold and wash it with Agrax Earthshade to have the same color as the decals

J'attends impatiemment mon vernis mat pour repasser une couche et atténuer l'effet brillant des décalcos.

I am waiting for a new spray can of mat varnish to apply another layer and mitigate the bright look of the decals.

Bon malheureusement, ma feuille bleue est trop petite pour que je fasse des photos stylées, donc on va se contenter de photos qui font un peu "amateur" :

Wel,l unfortunately, my blue sheet is too small for me to take cool pictures, so we'll just be happy with those unprofessional pictures:


Une Banshee pour l'armée de CV / A banshee for my VC army

Et on continue sur les comtes vampires cette fois avec un personnage spécial peint à l'aérographe : une banshee. J'ai utilisé exactement la même technique que pour les nuées, rien de très compliqué et méthode très rapide pour obtenir un rendu correct. J'ai peint le socle avec des bords marron car je trouvais que le vert avec le socle gris rendait moyen sur la figurine en entier, à voir si je change après.
J'ai eu un peu de mal pour lester le socle car la figurine est très déséquilibrée : j'ai donc placé un aimant en dessous car je me demande si en jouant, il ne vaut pas mieux l'intégrer carrément à un régiment de 40 histoire de la protéger. Il ne me reste plus que Vlad, un nécromancier, 4 chevaliers squelettes et 29 goules à lasurer et j'aurai tout fini!

And let's continue with the vampire counts with this time a special character painted with my airbrush: a banshee. I used exactly the same technique as for the spirit hosts: nothing very complicated and a very fast method to obtain proper results. I painted the base with brown edges because I felt the green and gray base didn't look so great, maybe I'll change it afterwards.
I had a little trouble giving weight to the base because the model is very unbalanced so I placed a magnet underneath because I wonder if during a battle I should place it into my 40 squeletons unit. I only have Vlad, a Necromancer, 4 black knights left to paint and 29 ghouls to dip and everything will be done!


Escouade de devastators Salamanders / Salamanders devastator squad

Je viens de me rendre compte que ça faisait près d'un mois que je n'avais rien posté, honte à moi. Il faut dire que j'ai un peu levé le pied ces derniers temps, ce qui m'a fait un peu du bien. Du coup, reprendre la peinture à fond, en particulier ce week-end de trois jours, a été un véritable plaisir qui m'a permis de finaliser quelques pièces commencées et laissées de côté.

I just realized that it's been a month since I haven't published anything, shame on me. I must say that I kinda backed off lately, which was good for me. So, going back to painting thoroughly, especially during the three-day weekend we had, was a pleasure that allowed me to finish some models that I had started and then abandonned.

Commençons tout d'abord par une nouvelle escouade pour mon armée de Salamanders. Et du lourd cette fois puisqu'il s'agit de 5 devastators comprenant : un sergent, un canon laser, un bolter lourd et de deux lance-plasmas lourds.

Let's start with a new squad for my Salamanders army. And something heavy this time : 5 Devastators comprising: a sergeant, a lascannon, a heavy bolter and two heavy plasma cannons.

L'escouade est quasiment terminée, il ne manque qu'une couche de vernis mat (j'ai usé ma bombe d'Army painter avec mes comtes vampires) et la bannière pour le sergent. Pour le lance-plasma, j'ai utilisé l'aérographe pour créer un dégradé de bleu. En attendant, voici le résultat :

The squad is almost finished, just in need of matt varnish (I used all my Army Painter spray canwith my Vampire Counts) and a banner for the sergeant. For plasma cannons, I used the airbrush to create the blue/white effect. Anyway, here is the final result: